Follow Me On Social Media!
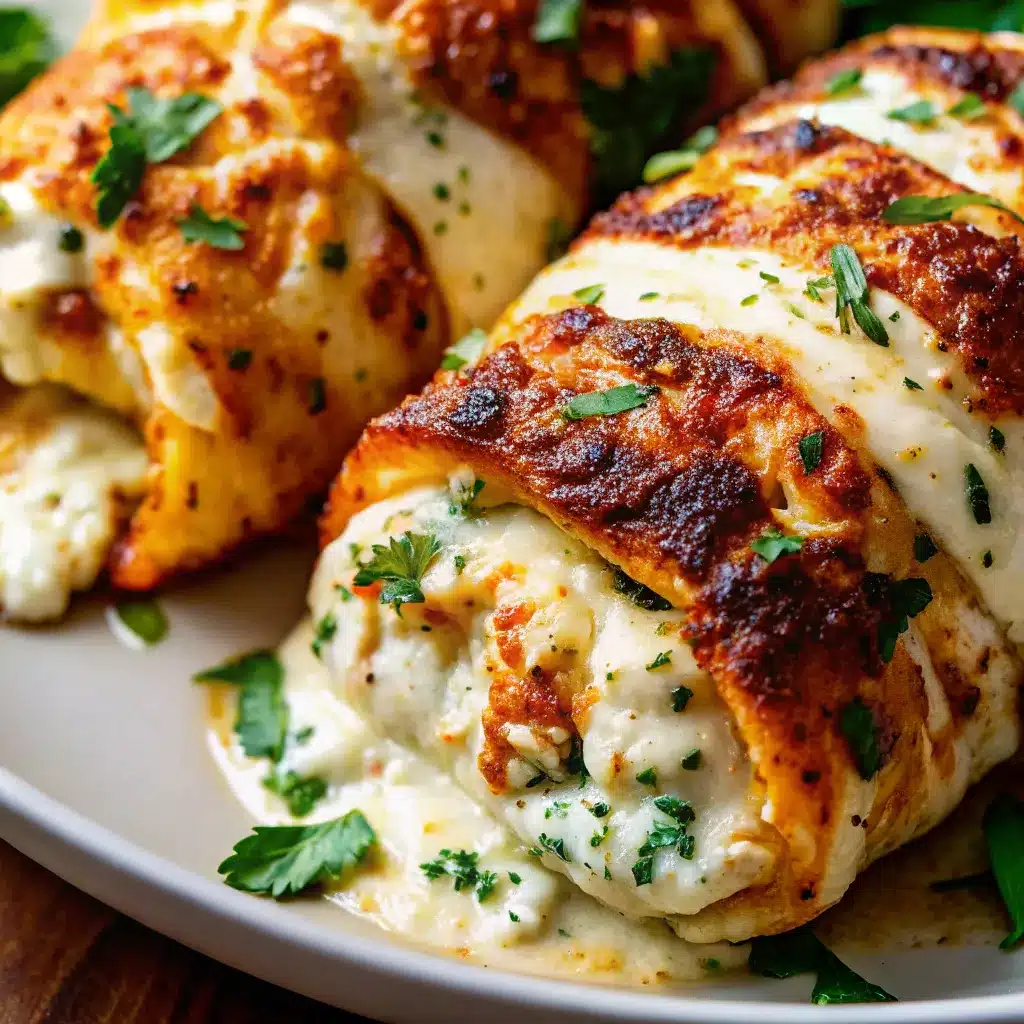
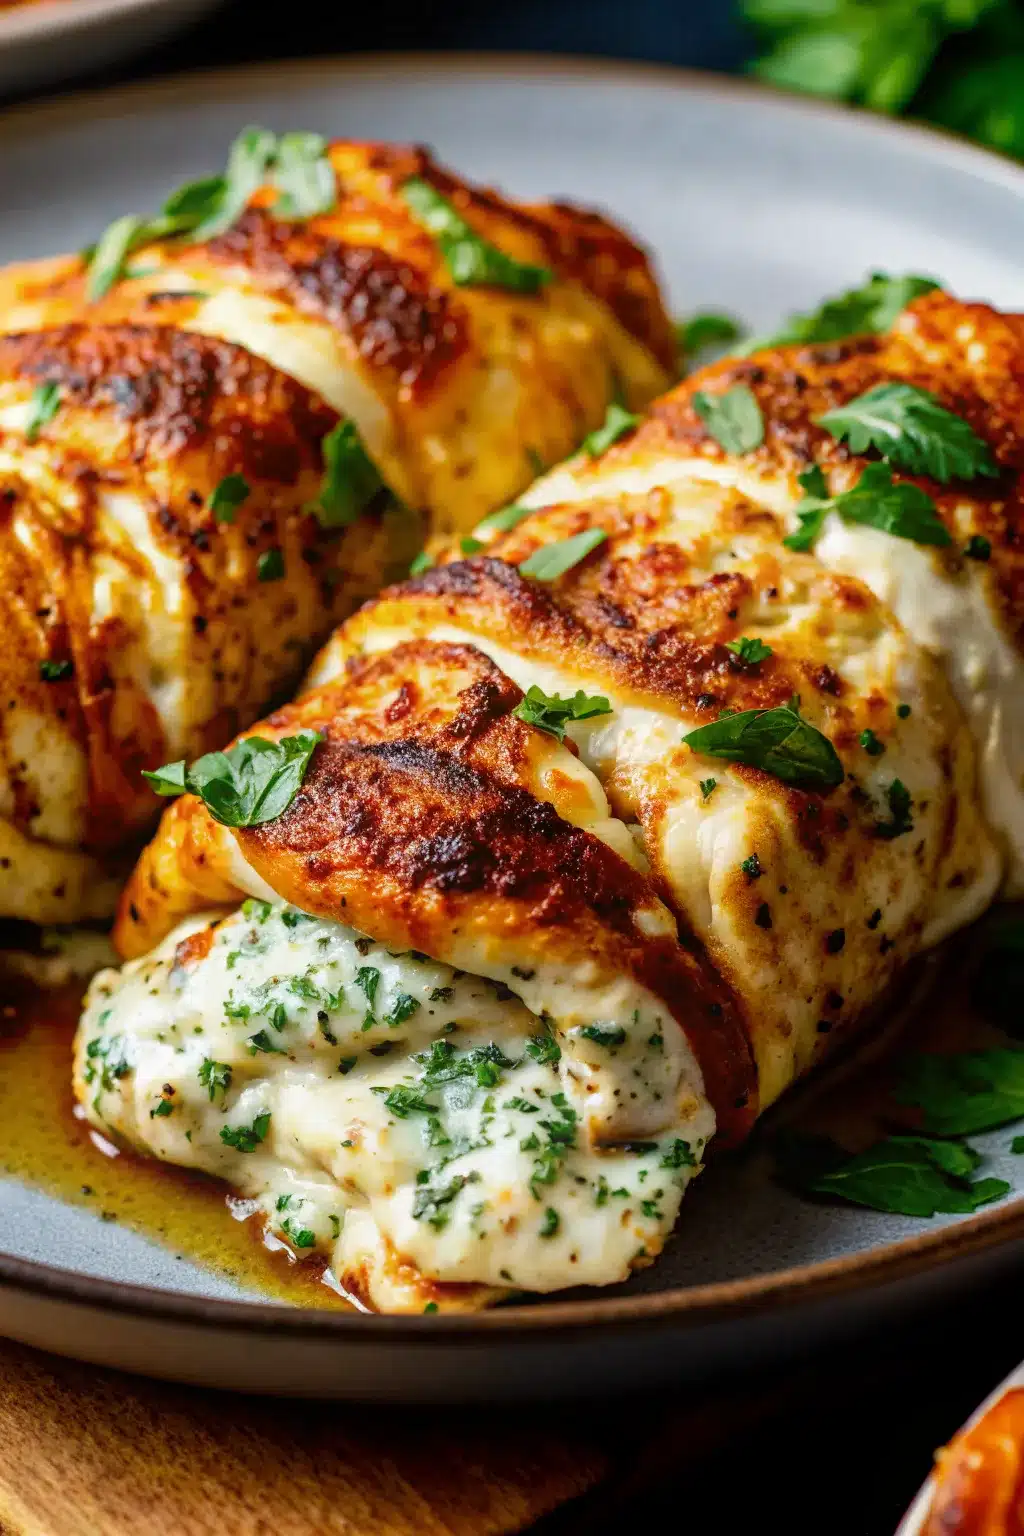
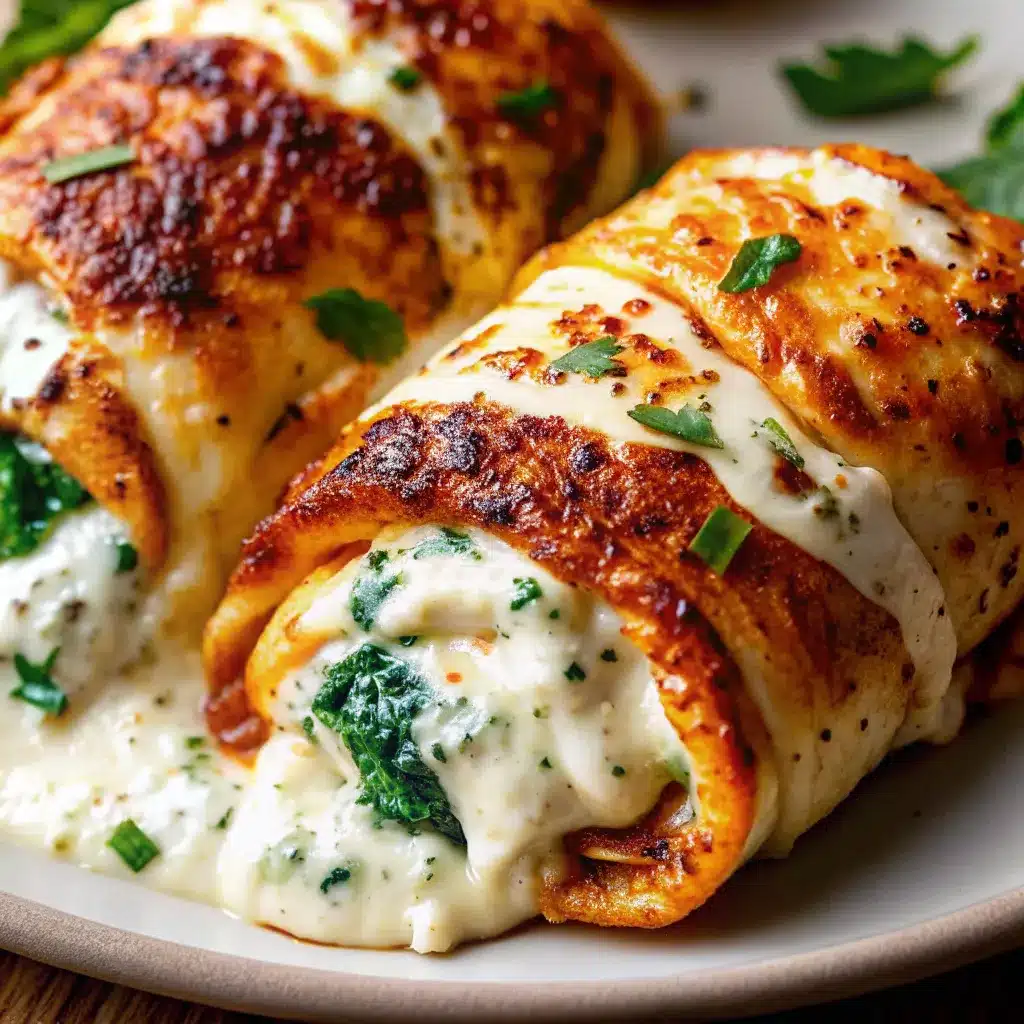
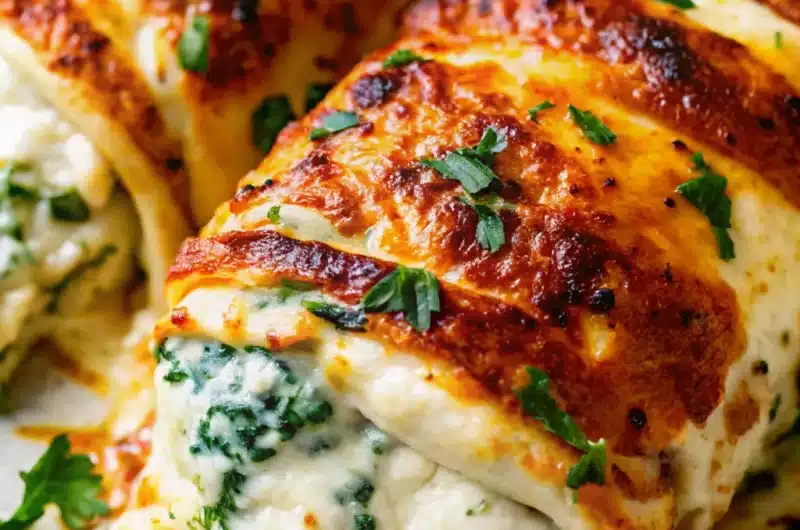
Air Fryer Chicken & Mozzarella Wraps
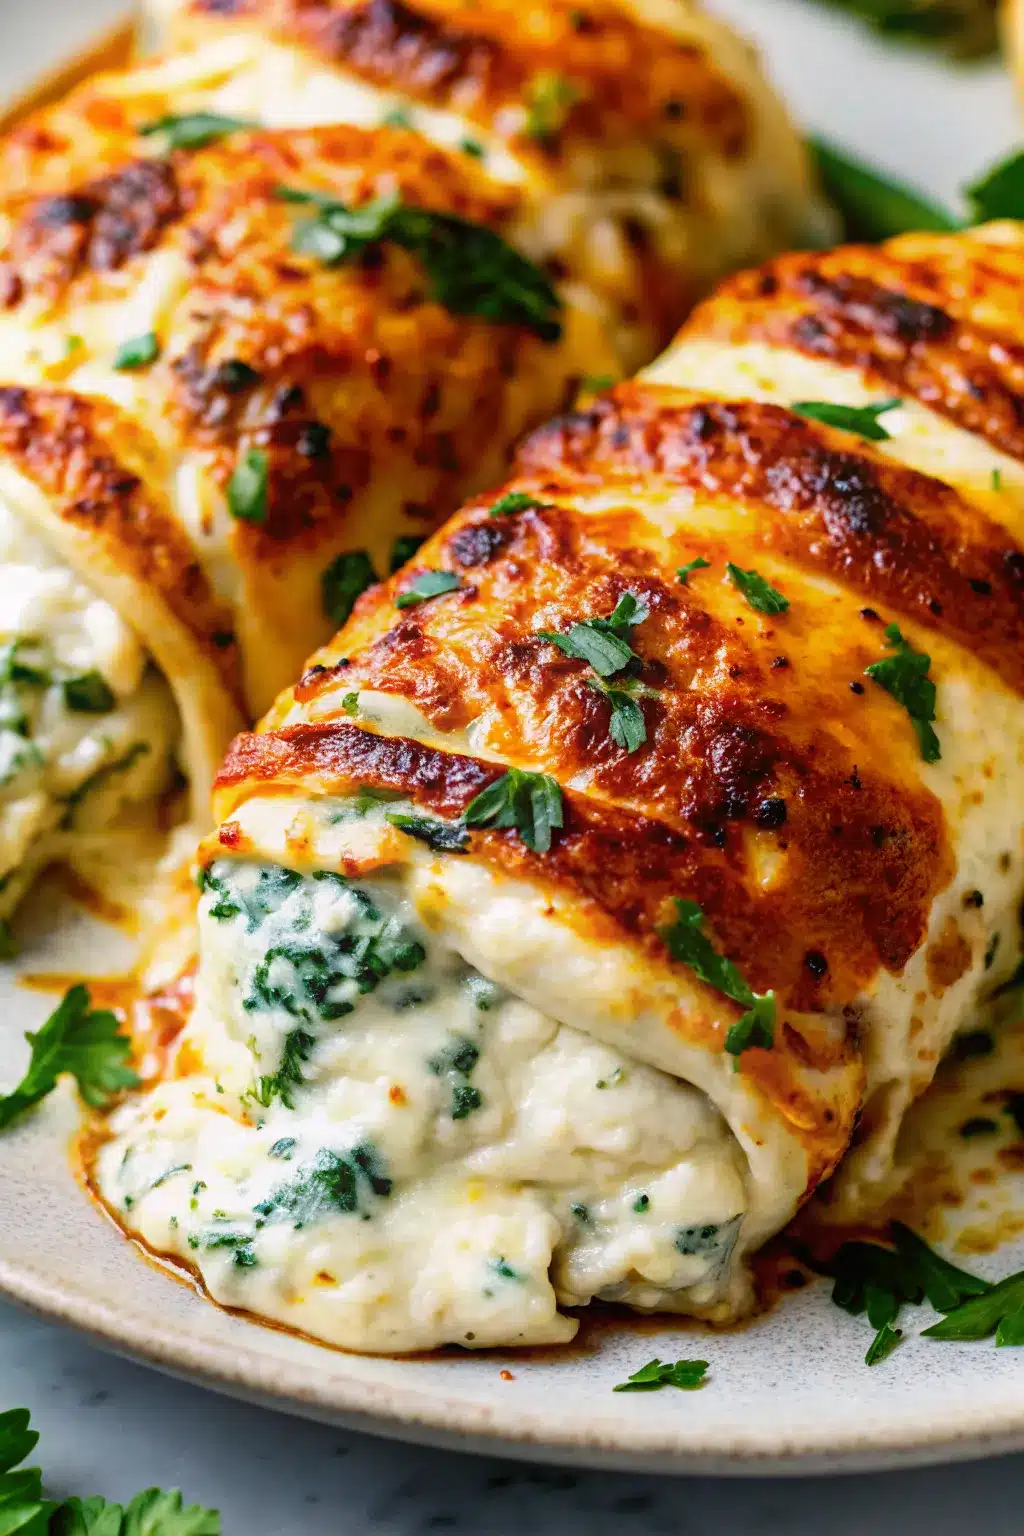
Ever have one of those nights where you need dinner to be both impressive and ridiculously easy? Welcome to your new favorite recipe. These Air Fryer Chicken & Mozzarella Wraps are basically what happens when comfort food meets convenience, and honestly, it’s a beautiful relationship. Crispy on the outside, melty and cheesy on the inside, and zero deep-frying required. You’re welcome.
Table of Contents
Why This Air Fryer Chicken & Mozzarella Wraps Recipe is Awesome
First off, melted mozzarella wrapped in chicken. Do I really need to say more? It’s like a fancy restaurant appetizer, except you’re making it in your pajamas on a Tuesday night. The cheese gets all gooey and stretchy, the chicken stays juicy, and that golden-brown exterior? Pure perfection.
The air fryer turns these wraps crispy without drowning them in oil, which means you get all the flavor without the guilt (or the greasy stovetop cleanup). It’s healthier than deep-frying but tastes just as indulgent. Your taste buds won’t know the difference, but your arteries will thank you.
This Air Fryer Chicken & Mozzarella Wraps recipe is shockingly versatile too. Serve them as an appetizer for game day, make them for dinner with a side salad, slice them up for meal prep, or just eat them straight out of the air fryer while standing in your kitchen. I’m not here to judge your life choices.
Plus, they look fancy enough that people will think you actually know what you’re doing. Little do they know it took you like 15 minutes of actual work. That’s the kind of kitchen magic we’re going for here.
Ingredients You’ll Need
- 2 large boneless, skinless chicken breasts (about 1 pound total)
- 4 ounces mozzarella cheese (fresh mozzarella or string cheese work great)
- 1/2 cup all-purpose flour (for dredging)
- 2 eggs (beaten, for the sticky middle layer)
- 1 cup panko breadcrumbs (regular breadcrumbs are fine but panko = extra crunch)
- 1/4 cup grated Parmesan cheese (adds flavor to the coating)
- 1 teaspoon Italian seasoning (or use garlic powder and dried basil)
- 1/2 teaspoon garlic powder (because garlic improves everything)
- 1/2 teaspoon paprika (for color and a hint of smokiness)
- Salt and pepper (to taste)
- Toothpicks (for holding everything together)
- Cooking spray (olive oil spray works best)
Step-by-Step Instructions
1. Prep your chicken like a pro. Place chicken breasts on a cutting board and slice them horizontally to create thin cutlets—aim for about 1/4 to 1/2 inch thick. If they’re still too thick, gently pound them with a meat mallet or the bottom of a heavy pan. You want them thin enough to roll but not so thin they tear. Cover with plastic wrap before pounding to avoid chicken splatter—trust me on this.
2. Season those cutlets. Season both sides of your chicken cutlets with salt and pepper. Don’t be shy here—this is your base layer of flavor, so make it count.
3. Add the cheese situation. Cut your mozzarella into sticks about 3 inches long and 1/2 inch thick. If you’re using string cheese, just cut them in half lengthwise—easy peasy. Place a piece of cheese at one end of each chicken cutlet, then roll it up tightly like a burrito. Secure with toothpicks so they don’t unroll during cooking. Make sure those ends are tucked in or you’ll have cheese leakage, and nobody wants that.
4. Set up your breading station. Grab three shallow bowls. Put flour in the first one, beaten eggs in the second, and mix together the panko, Parmesan, Italian seasoning, garlic powder, and paprika in the third. This is your assembly line—keep it organized and you’ll breeze through this step.
5. Coat each wrap carefully. Roll each chicken wrap in flour first, shaking off the excess. Dip it in the egg mixture, letting extra drip off. Finally, roll it in the breadcrumb mixture, pressing firmly to coat all sides. Pay extra attention to the ends—that’s where cheese likes to escape, so make sure they’re well-sealed with coating.
6. Preheat that air fryer. Set it to 380°F and let it preheat for about 3 minutes. Consistent temperature is key for even cooking and that perfect golden crust.
7. Arrange and spray. Place your wrapped chicken in the air fryer basket seam-side down, leaving space between each one. Don’t overcrowd—cook in batches if needed. Give them a generous spray with cooking oil on all sides. This is what creates that crispy, golden exterior.
8. Air fry to melty perfection. Cook for 12-15 minutes, carefully flipping halfway through and spraying the other side. You’re looking for a golden-brown crust and an internal temperature of 165°F. The cheese inside should be melted and gooey—if you see a little cheese oozing out, that’s actually a good sign.
9. Rest and remove toothpicks. Let them rest for 3-5 minutes after cooking. This helps the cheese set slightly so it doesn’t all run out when you cut into them. Don’t forget to remove those toothpicks before serving—learned that one the hard way.
Common Mistakes to Avoid
Not pounding the chicken thin enough. Thick chicken = uneven cooking and tough, chewy texture. Take the time to get those cutlets nice and thin. Your jaw will thank you later.
Overfilling with cheese. I know, more cheese sounds better, but too much will leak everywhere and make a mess. Stick to one piece of string cheese or a modest mozzarella stick per wrap. Self-control is hard, but necessary.
Forgetting to seal the ends. Those ends are escape routes for your cheese. Tuck them in tightly and make sure they’re coated well with breadcrumbs. Think of the coating as edible glue.
Skipping the toothpicks. Your wraps will unroll during cooking without them, and then you’ll just have sad, flat chicken with cheese everywhere. Use the toothpicks. It’s not optional.
Not spraying enough oil. The air fryer isn’t magic—it needs a little help from cooking spray to get things crispy. Be generous with it, especially on the first side that goes down in the basket.
Alternatives & Substitutions
Different cheese options? Try provolone, pepper jack for some heat, cheddar, or even cream cheese mixed with herbs. Swiss cheese works great too. Just avoid super soft cheeses that’ll turn into liquid—you want something that melts but holds together somewhat.
Add some veggies? Tuck in some spinach leaves, roasted red peppers, or sun-dried tomatoes before rolling. Just make sure they’re patted dry or you’ll have moisture issues with your coating.
Make it gluten-free? Use gluten-free flour and gluten-free breadcrumbs. The texture will be slightly different but still delicious. Crushed gluten-free cornflakes work amazing too.
Want more flavor? Add some pesto or marinara sauce inside with the cheese. You can also mix some dried herbs or red pepper flakes into your breadcrumb mixture for extra kick.
Using chicken thighs instead? It’s doable, but they’re trickier to roll because they’re less uniform in shape. If you go this route, make sure you really pound them thin and even.
Final Thoughts
Look, I’m not saying these Air Fryer Chicken & Mozzarella Wraps will solve all your problems, but they’ll definitely solve the “what’s for dinner” problem, and sometimes that’s enough. They’re crispy, cheesy, surprisingly easy, and the kind of recipe that makes you look like you put in way more effort than you actually did.
The best part? Once you master the basic technique, you can customize these however you want. Different cheeses, different seasonings, add some bacon, throw in some jalapeños—the possibilities are endless. You’re basically a culinary genius now.
These wraps are perfect for feeding a crowd, impressing a date, or just treating yourself because you deserve something delicious. Plus, they reheat surprisingly well, which means you can make extra and have lunch sorted for the next day.
Now go forth and wrap some chicken around some cheese. Your stomach is about to be very happy with you.
FAQ (Frequently Asked Questions)
Can I make these ahead of time? Yes! Bread the chicken wraps and store them in the fridge for up to 4 hours before cooking. You can also freeze them uncooked—just place them on a baking sheet until frozen solid, then transfer to a freezer bag. Cook from frozen, adding 3-5 extra minutes to the cooking time. Just note that the coating might not be quite as crispy as fresh.
Help! My cheese is leaking everywhere! This usually happens if the ends aren’t sealed properly or if you overfilled them with cheese. Make sure you’re tucking those ends in tightly and using toothpicks to secure everything. Also, don’t skip the flour coating—it helps seal things up. If a little cheese escapes during cooking, it’s not the end of the world, just scrape it off when you’re done.
What should I serve with these wraps? They’re pretty rich, so I like to serve them with something light and fresh. A simple green salad with balsamic vinaigrette, roasted vegetables, marinara sauce for dipping, or even some garlic bread if you’re really going for it. Caesar salad is always a solid choice too. Or just eat them with your hands and call it a day.
Can I bake these in a regular oven instead? Absolutely! Preheat your oven to 400°F, place the wraps on a baking sheet lined with parchment paper, spray them generously with cooking oil, and bake for 20-25 minutes, flipping halfway through. They won’t be quite as crispy as the air fryer version, but they’ll still be delicious. You can also broil them for the last 2 minutes to get extra color.
Air Fryer Chicken & Mozzarella Wraps
Course: Air Fryer, Main Course, Appetizer, DinnerCuisine: Italian-AmericanDifficulty: MediumServings
4
servingsPrep time
15
minutesCooking time
15
minutesCalories
418
kcalTotal time
30
minutesIngredients
2 large boneless, skinless chicken breasts (about 1 pound total)
4 ounces mozzarella cheese (fresh mozzarella or string cheese)
1/2 cup all-purpose flour
2 eggs, beaten
1 cup panko breadcrumbs
1/4 cup grated Parmesan cheese
1 teaspoon Italian seasoning
1/2 teaspoon garlic powder
1/2 teaspoon paprika
Salt and pepper to taste
Toothpicks
Cooking spray
Directions
- Slice chicken breasts horizontally to create thin cutlets about 1/4 to 1/2 inch thick. Gently pound if needed to even thickness. Season both sides with salt and pepper.
- Cut mozzarella into sticks about 3 inches long and 1/2 inch thick. Place one cheese stick at one end of each chicken cutlet and roll tightly, tucking in the ends. Secure with toothpicks.
- Set up three shallow bowls: flour in the first, beaten eggs in the second, and panko mixed with Parmesan, Italian seasoning, garlic powder, and paprika in the third.
- Roll each chicken wrap in flour, shaking off excess. Dip in egg mixture, letting excess drip off. Roll in breadcrumb mixture, pressing firmly to coat all sides, especially the ends.
- Preheat air fryer to 380°F for 3 minutes.
- Place chicken wraps seam-side down in air fryer basket without overcrowding. Spray generously with cooking oil on all sides.
- Cook for 12-15 minutes, flipping halfway through and spraying the other side, until golden brown and internal temperature reaches 165°F.
- Let rest for 3-5 minutes. Remove toothpicks before serving.
Notes
- Pound chicken thin and even (1/4 to 1/2 inch thick) to ensure it cooks evenly and rolls easily without tearing or being too thick.
- Seal the ends tightly and coat well with breadcrumbs to prevent cheese from leaking out during cooking—this is crucial for keeping everything intact.
- Don’t forget to remove toothpicks after cooking and before serving to avoid any unfortunate biting incidents.