Follow Me On Social Media!
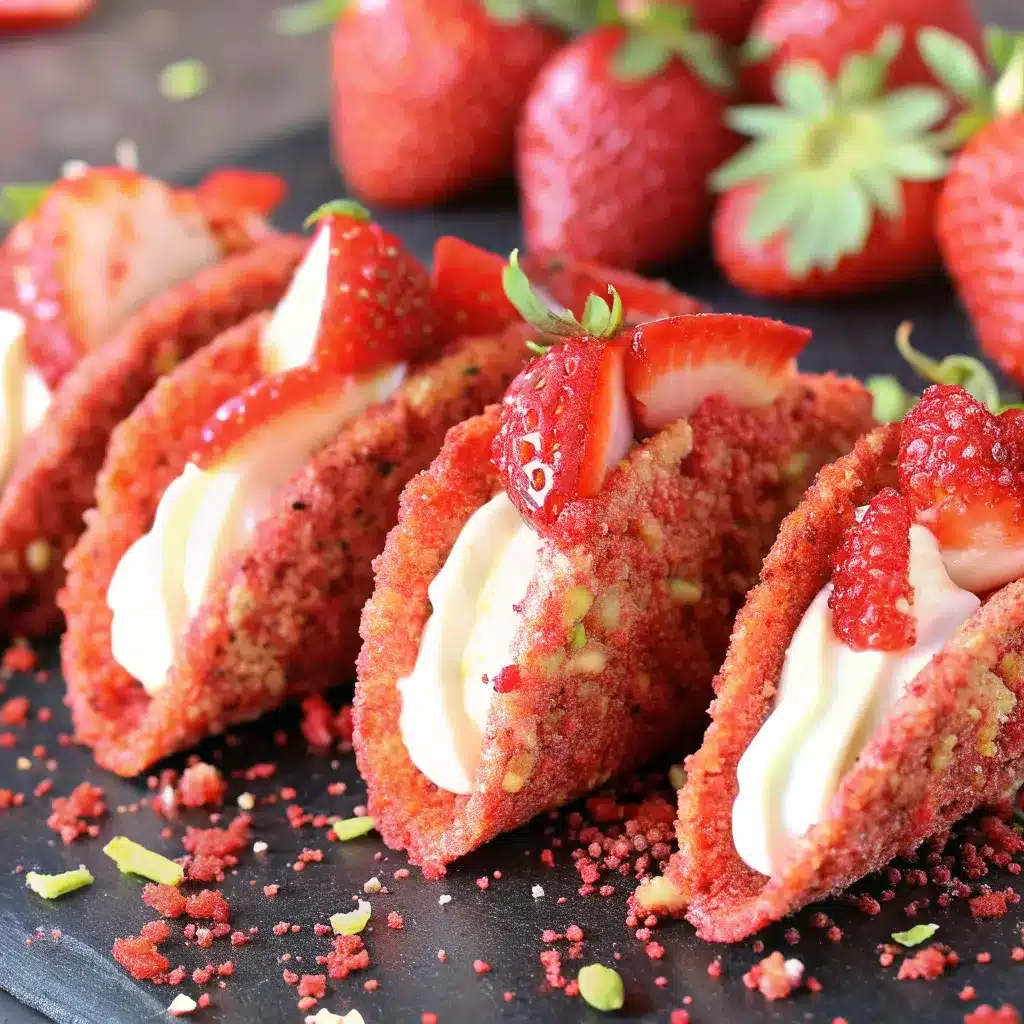
Strawberry Crunch Cheesecake Tacos

Okay, so you’ve seen these all over TikTok and Instagram, and now you’re here because you need to know if they’re actually as good as they look. Short answer? Yes. Long answer? YESSSSS. These strawberry crunch cheesecake tacos are basically what happens when a strawberry shortcake ice cream bar and a fancy dessert have a baby, and that baby decides to dress up like a taco for maximum cuteness.
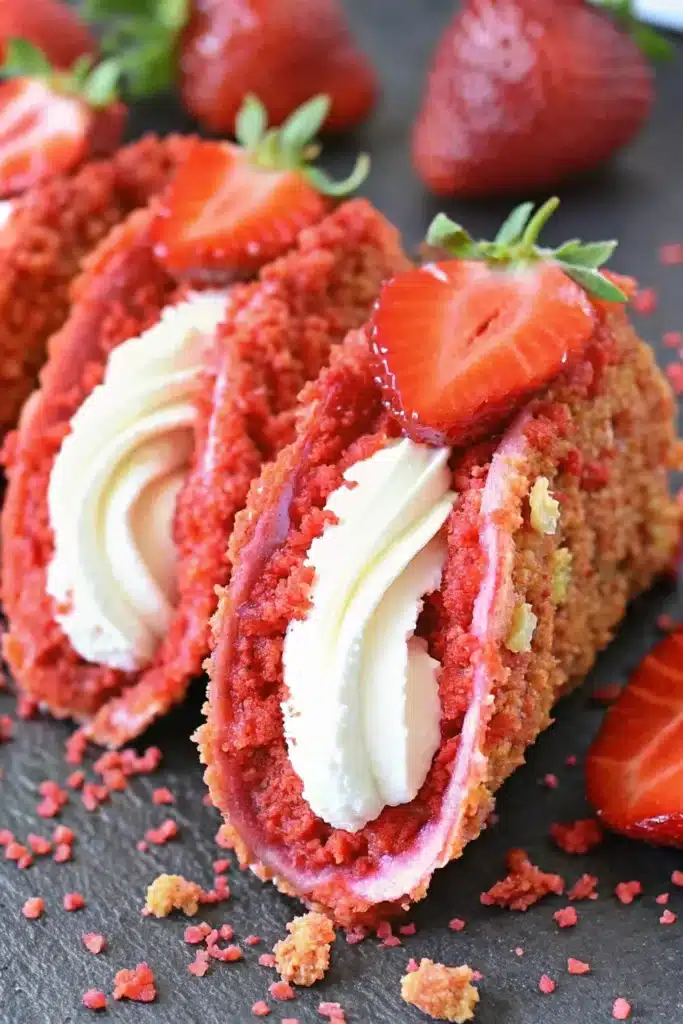
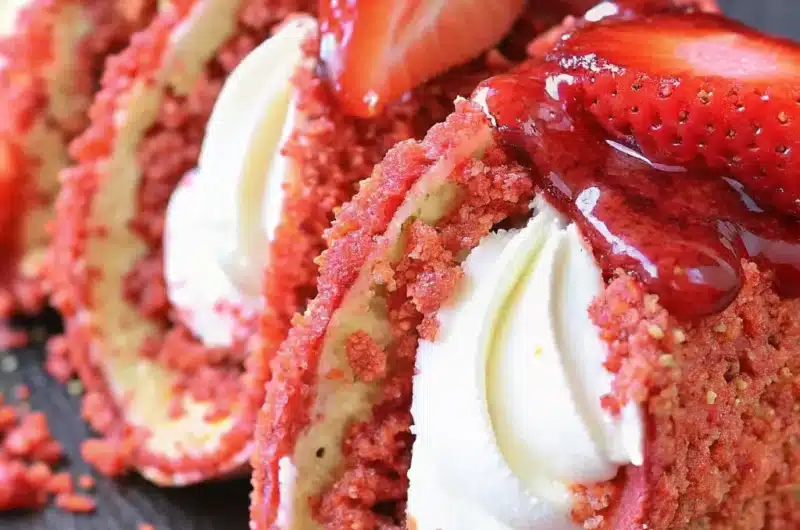
Let’s be real—these Strawberry Crunch Cheesecake Tacos aren’t actual tacos. Nobody’s putting ground beef and lettuce in here (and if you are, we need to have a serious conversation). These are crispy, crunchy taco-shaped shells filled with creamy no-bake cheesecake, topped with fresh strawberries and that magical pink crunch coating that tastes like nostalgia and summer. They’re fun, they’re Instagram-worthy, and honestly? They’re way easier to make than they look.
Table of Contents
Why This Strawberry Crunch Cheesecake Tacos Are Good
First off, let’s talk about the wow factor. You could show up to literally any gathering with a platter of these and people will lose their minds. “How did you make these?” “Where did you get the recipe?” “Can I have seven more?” Trust me, you’ll be the hero of the party, and all you did was mix some stuff and dip some shells.
Second, they’re ridiculously fun to make. Like, kid-friendly fun. If you’ve got tiny humans running around, let them help with the dipping and decorating. It’s messy, it’s colorful, and it keeps them occupied while you secretly eat half the cheesecake filling straight from the bowl. (What? It needs quality control.)
Third—and this is important—there’s no baking involved. Zero. Zilch. The hardest part is waiting for everything to chill, and even that’s optional if you’re impatient. The shells are store-bought, the filling is no-bake, and the topping is just crushed cookies mixed with gelatin. You could make these in your sleep. Actually, please don’t do that, but you get the point.
Plus, Strawberry Crunch Cheesecake Tacos are completely customizable. Don’t like strawberries? Use different fruit. Want them chocolatey? Switch up the shells. The base recipe is a blank canvas for whatever dessert fever dream you’re having. And unlike actual tacos, nobody’s going to judge you for eating dessert tacos for breakfast. (Okay, maybe someone will, but ignore them.)
Ingredients For Strawberry Crunch Cheesecake Tacos
Here’s what you’re gathering for this sugar-filled adventure:
For the taco shells:
- 12 waffle cones or sugar cones – the kind in the ice cream aisle
- 2 cups white chocolate or candy melts – your choice, both work great
- Pink or red food coloring (optional) – if you want those shells extra cute
For the strawberry crunch coating:
- 2 cups Golden Oreos (about 20 cookies) – yes, the golden ones specifically
- 3 oz strawberry gelatin powder – one small box, like Jell-O brand
- 6 tbsp unsalted butter, melted – to bind it all together
For the cheesecake filling:
- 8 oz cream cheese – full-fat, softened (don’t even think about fat-free)
- ½ cup powdered sugar – sifted if you’re fancy
- 1 tsp vanilla extract – always
- 1½ cups heavy whipping cream – cold from the fridge
- 2 tbsp granulated sugar – for the whipped cream
For topping:
- 1 cup fresh strawberries – diced small
- Extra strawberry crunch – because more is more
- Whipped cream (optional) – for that final flourish
Step-by-Step Instructions
1. Make the magic crunch coating first. Put those Golden Oreos in a food processor and pulse until they’re fine crumbs. Add the strawberry gelatin powder and melted butter, then pulse again until it looks like pink cookie sand. Set aside about ½ cup for the filling, and keep the rest for coating the shells and topping. This stuff is liquid gold, handle with care.
2. Shape your taco shells. Here’s where it gets fun. Wrap each waffle cone in aluminum foil to protect it, then carefully break or cut them into taco shell shapes—basically a U-shape that can stand up. You can also buy pre-made waffle taco shells if you don’t want to deal with this step. No shame in the shortcut game.
3. Coat those shells in chocolate. Melt your white chocolate or candy melts according to package directions (microwave in 30-second bursts, stirring between). Add a few drops of food coloring if you want pink shells—totally optional but super cute. Dip each shell in the chocolate, letting excess drip off, then immediately sprinkle or roll in the strawberry crunch coating. Place on parchment paper to set. Work quickly because chocolate waits for no one.
4. Make the cheesecake filling. In a large bowl, beat the softened cream cheese with powdered sugar and vanilla until it’s smooth and fluffy. In a separate bowl, whip the heavy cream with granulated sugar until stiff peaks form. Fold about half the whipped cream into the cream cheese mixture until combined, then fold in the remaining whipped cream. Gently fold in that reserved ½ cup of strawberry crunch. Now you’ve got pink-speckled cheesecake clouds.
5. Chill everything. Pop your coated shells in the fridge to set completely (about 30 minutes) and keep your cheesecake filling chilled too. This is a good time to prep your strawberries—dice them up small so they fit nicely in the tacos.
6. Assemble like a boss. Transfer your cheesecake filling to a piping bag (or a ziplock bag with the corner cut off—we’re not fancy). Pipe the filling into each taco shell, filling them generously. Don’t be stingy here—nobody likes a sad, empty taco.
7. Top it off and make it pretty. Sprinkle diced strawberries over the filling, add more strawberry crunch on top, and if you’re feeling extra, add a dollop of whipped cream. Make them as Instagram-worthy as your heart desires. Go wild.
8. Serve immediately or chill. These are best served within a few hours of assembly. You can make the components ahead, but once you fill the shells, the clock is ticking before they start getting soft. Not that anyone will let them sit around that long anyway.
Common Mistakes to Avoid
Using cold cream cheese. Cold cream cheese is lumpy cream cheese, and lumpy filling is sad. Let it sit at room temperature for at least 30 minutes before you start, or give it a few seconds in the microwave. You want it soft and spreadable, not brick-like.
Overworking the chocolate coating. If your chocolate gets too thick while you’re dipping, reheat it gently. Thick chocolate means thick, uneven coating and nobody wants that. Keep it smooth and workable by reheating in short bursts as needed.
Assembling too early. The shells will get soggy if they sit filled for too long. Make all your components ahead of time, sure, but fill the shells no more than 2-3 hours before serving. Crispy shells are non-negotiable for the full experience.
Skipping the strawberry crunch in the filling. I know it seems like overkill, but that crunch mixed into the cheesecake filling is what makes these special. It adds texture and that signature strawberry shortcake bar flavor. Don’t skip it.
Alternatives & Substitutions
Can’t find Golden Oreos? Use vanilla wafer cookies or Nilla Wafers instead. You’ll still get that vanilla-strawberry vibe. Regular Oreos will make it taste like… well, regular Oreos with strawberry, which isn’t necessarily bad, just different.
Want to go full chocolate? Use chocolate candy melts for the shells and chocolate waffle cones, then top with regular crushed Oreos instead of the strawberry crunch. Boom, chocolate cheesecake tacos.
Dairy-free version? Use dairy-free cream cheese and coconut whipping cream. The texture won’t be quite as stable, but it’ll still taste good. Just serve them immediately after filling.
Not into strawberries? Try blueberries, raspberries, or even mango chunks. You can adjust the crunch coating flavor by using different Jell-O flavors—raspberry, cherry, or mixed berry would all be amazing.
For a boozy adult version, add a tablespoon of strawberry liqueur or Baileys to the cheesecake filling. Just don’t tell the kids why the adults are hogging all the tacos.
Final Thoughts
Look, are these strawberry crunch cheesecake tacos a little extra? Absolutely. Are they worth the hype? One hundred percent. They’re sweet, crunchy, creamy, and just plain fun to eat. These are the kind of dessert that makes people smile before they even take a bite, and isn’t that what dessert should be about?
Whether you’re making these Strawberry Crunch Cheesecake Tacos for a party, a special occasion, or just because it’s Tuesday and you deserve nice things, they’re guaranteed to be a hit. Fair warning though: people will ask you to make them again. And again. You’ve been warned.
Now go make some dessert tacos and live your best, most delicious life. Your Instagram feed (and your taste buds) will thank you.
FAQ (Frequently Asked Questions)
Can I make these ahead of time? Sort of! You can make the shells, crunch coating, and cheesecake filling up to 2 days ahead and store them separately in the fridge. But only fill the shells 2-3 hours before serving max, or they’ll get soggy. The crispy shell is half the experience, so don’t sacrifice it for convenience.
Where do I find waffle taco shells? Some stores sell pre-made waffle taco shells (check the ice cream cone aisle or baking section), but you can also make them from regular waffle cones. Just carefully break or cut them into a taco shape. It’s a little janky but it works. You can also find taco-shaped pizzelle or waffle makers online if you want to get really fancy.
Why Golden Oreos specifically for the crunch? Golden Oreos have a vanilla flavor that mimics the vanilla wafer coating on those classic strawberry shortcake ice cream bars—that’s the flavor profile we’re going for here. Regular chocolate Oreos would overpower the strawberry and make everything taste like chocolate-covered strawberries, which is fine, but not the same vibe.
How do I keep the shells from getting soggy? The chocolate coating helps create a barrier, but moisture is inevitable. Assemble as close to serving time as possible—within 2-3 hours is ideal. You can also brush the inside of the shells with a thin layer of melted chocolate before filling as extra insurance. And serve them on the same day you assemble them.
Strawberry Crunch Cheesecake Tacos
Course: DessertCuisine: American, FusionServings
12
tacosPrep time
30
minutesCooking time
5
minutesCalories
385
kcalTotal time
35
minutesIngredients
- For the taco shells:
12 waffle cones or sugar cones
2 cups white chocolate or candy melts
Pink or red food coloring (optional)
- For the strawberry crunch coating:
2 cups Golden Oreos (about 20 cookies)
3 oz strawberry gelatin powder (1 small box)
6 tbsp unsalted butter, melted
- For the cheesecake filling:
8 oz cream cheese, softened
½ cup powdered sugar
1 tsp vanilla extract
1½ cups heavy whipping cream, cold
2 tbsp granulated sugar
- For topping:
1 cup fresh strawberries, diced
Extra strawberry crunch
Whipped cream (optional)
Directions
- In a food processor, pulse Golden Oreos until fine crumbs. Add strawberry gelatin powder and melted butter, pulse until combined. Reserve ½ cup for filling, set rest aside for coating.
- Shape waffle cones into taco shells by wrapping in foil and carefully breaking/cutting into U-shapes, or use pre-made waffle taco shells.
- Melt white chocolate or candy melts in microwave in 30-second intervals, stirring between. Add food coloring if desired.
- Dip each shell in melted chocolate, let excess drip off, then immediately coat in strawberry crunch. Place on parchment paper.
- For filling: Beat softened cream cheese with powdered sugar and vanilla until smooth. In separate bowl, whip heavy cream with granulated sugar to stiff peaks.
- Fold half the whipped cream into cream cheese mixture, then fold in remaining whipped cream. Gently fold in reserved ½ cup strawberry crunch.
- Refrigerate coated shells for 30 minutes to set. Keep cheesecake filling chilled.
- Transfer filling to piping bag and pipe into each taco shell. Top with diced strawberries, extra strawberry crunch, and whipped cream if desired.
- Serve immediately or within 2-3 hours for best texture.
Notes
- Tip 1: Soften cream cheese to room temperature for at least 30 minutes before using to ensure smooth, lump-free filling.
- Tip 2: Assemble tacos no more than 2-3 hours before serving to keep shells crispy. The chocolate coating helps, but moisture from filling will eventually soften them.
- Tip 3: Work quickly when coating shells in chocolate—if chocolate thickens, reheat in microwave for 10-15 seconds to keep it smooth and workable.